在Ubuntu20.04上安装Blogdown
准备工作
安装R
sudo apt install r-base
安装 RStudio
下载最新的deb包
https://www.rstudio.com/products/rstudio/download/#download
sudo apt install gdebi
sudo gdebi rsutio-*.deb
安装git并配置
sudo apt install git
git config --global user.name "Your Name"
git config --global user.email "[email protected]"
生成新 SSH 密钥
-
打开 Terminal(终端)。
-
粘贴下面的文本(替换为您的 GitHub 电子邮件地址)。
$ ssh-keygen -t rsa -b 4096 -C "[email protected]"这将创建以所提供的电子邮件地址为标签的新 SSH 密钥。
> Generating public/private rsa key pair. -
提示您“Enter a file in which to save the key(输入要保存密钥的文件)”时,按 Enter 键。 这将接受默认文件位置。
> Enter a file in which to save the key (/home/you/.ssh/id_rsa): [Press enter] -
在提示时输入安全密码。 更多信息请参阅“使用 SSH 密钥密码”。
> Enter passphrase (empty for no passphrase): [Type a passphrase]
> Enter same passphrase again: [Type passphrase again]
将 SSH 密钥添加到 ssh-agent
将新 SSH 密钥添加到 ssh-agent 以管理密钥之前,应检查现有 SSH 密钥并生成新 SSH 密钥。
-
在后台启动 ssh 代理。
$ eval "$(ssh-agent -s)" > Agent pid 59566 -
将 SSH 私钥添加到 ssh-agent。 如果您创建了不同名称的密钥,或者您要添加不同名称的现有密钥,请将命令中的 id_rsa 替换为您的私钥文件的名称。
$ ssh-add ~/.ssh/id_rsa
新增 SSH 密钥到 GitHub 帐户
要配置 GitHub 帐户使用新的(或现有)SSH 密钥,您还需要将其添加到 GitHub 帐户。
在新增 SSH 密钥到 GitHub 帐户之前,您应该已:
在新增 SSH 密钥到 GitHub 帐户后,您可以重新配置任何本地仓库使用 SSH。 更多信息请参阅“将远程 URL 从 HTTPS 转换为 SSH”。
**注意:**DSA 密钥 (SSH-DSS) 不再受支持。 现有密钥将继续运行,但您不能将新的 DSA 密钥添加到您的 GitHub 帐户。
-
将 SSH 密钥复制到剪贴板。
如果您的 SSH 密钥文件与示例代码不同,请修改文件名以匹配您当前的设置。 在复制密钥时,请勿添加任何新行或空格。
$ sudo apt-get install xclip
# Downloads and installs xclip. If you don't have `apt-get`, you might need to use another installer (like `yum`)

$ xclip -sel clip < ~/.ssh/id_rsa.pub
# Copies the contents of the id_rsa.pub file to your clipboard
**提示:**如果
xclip不可用,可找到隐藏的.ssh文件夹,在常用的文本编辑器中打开该文件,并将其复制到剪贴板。 -
在任何页面的右上角,单击您的个人资料照片,然后单击 Settings(设置)。

-
在用户设置侧边栏中,单击 SSH and GPG keys(SSH 和 GPG 密钥)。

-
单击 **New SSH key(新 SSH 密钥)**或 Add SSH key(添加 SSH 密钥)。

-
在 “Title”(标题)字段中,为新密钥添加描述性标签。 例如,如果您使用的是个人 Mac,此密钥名称可能是 “Personal MacBook Air”。
-
将密钥粘贴到 “Key”(密钥)字段。

-
单击 Add SSH key(添加 SSH 密钥)。

-
如有提示,请确认您的 GitHub 密码。

新增 SSH 密钥到项目
密钥保存名称要修改为其他名字,和上一个不同即可。然后将此密钥复制到github项目的settings–>Deploy keys.
RStudio 配置
安装好上述软件后,需要对 rstudio 进行一下简单配置:
-
Tools -> Global Options -> Sweave -> Weave Rnw files using:knitr
-
Tools -> Global Options -> Sweave -> Typeset LaTex into PDF using:
XeLaTeX
- 这个是生成 PDF 文件用的,中文用户最好选择 XeLaTeX

- Tools -> Global Options -> Git/SVN -> Git executable:
- 安装好 git 后,打开这里应该就可以看到 git 的路径了

- Tools -> Global Options -> Packages -> CRAN mirror:
- 建议选择一个距离你比较近的镜像,速度会快点。例如,国内用户可以选择一个 China 的镜像。

安装 blogdown 和 hugo
配置代理
编辑写入 ~/.Renviron.
http_proxy=http://proxy.dom.com/
http_proxy_user=user:passwd
https_proxy=https://proxy.dom.com/
https_proxy_user=user:passwd
安装 blogdown
install.packages('blogdown')
安装 hugo
blogdown::install_hugo()
如果安装 hugo 的时候出现下面的错误 (貌似有同志也有这个问题):
> blogdown::install_hugo()
The latest hugo version is 0.32.4
trying URL 'https://github.com/gohugoio/hugo/releases/download/v0.32.4/hugo_0.32.4_Windows-64bit.zip'
trying URL 'https://github.com/gohugoio/hugo/releases/download/v0.32.4/hugo_0.32.4_Windows-64bit.zip'
Error in download.file(url, ..., method = method, extra = extra) :
  cannot open URL 'https://github.com/gohugoio/hugo/releases/download/v0.32.4/hugo_0.32.4_Windows-64bit.zip'
In addition: Warning messages:
1: In download.file(url, ..., method = method, extra = extra) :
  InternetOpenUrl failed: ''
2: In download.file(url, ..., method = method, extra = extra) :
  InternetOpenUrl failed: ''
这个时候就直接安装开发版,就可以解决:
install.packages("devtools")
devtools::install_github("rstudio/blogdown")
如果安装了开发版的 blogdown,还没有搞定,那么就把错误信息中的链接复制到浏览器直接下载,把文件解压发现里面就只有一个文件,Yihui 选择 hugo 就是因为 hugo 只有一个文件,够简单,至于为什么我会知道 Yihui 选择 hugo 的原因?因为我读了 blogdown 故事。
把解压好的 hugo.exe 文件放在d:/根目录下,然后输入下面代码安装 hugo:
### 注意这里是三个冒号
blogdown:::install_hugo_bin("d:/hugo.exe")
安装成功。
不知道是不是网络国际出口的问题,最近从 github 下载文件都比较慢 (浏览 github 网页倒没有问题),经常用devtools::install_github()安装包都不成功,就算用浏览器下载 hugo 也经常出现错误,估计这就是用blogdown::install_hugo()安装不了的原因吧。
ok,我们来到这里,暂时离开一下 rstudio,我们去弄弄 github。
注册域名
虽然个人域名不是必须的(你可以直接使用 netlify 的二级域名,如 yourname.netlify.com),但是为了彰显个性,当然是注册个人域名啦。
怎么注册域名就不详说了,国内的有万网等,国外有 GoDaddy 之类的,选择国内服务商的话,域名要备案,国外就可以省略这个步骤。
还有第三个选择就是到 rbind.io 向 blogdown 组织申请一个二级域名 yourname.rbind.io。
下面的内容是针对已经申请个人域名来展示的。
用 github 创建 repository

如图所示填写好 repository name、Description,默认选择 Public,可以选择复选框 Initialize this repository with a README,add .gitignore选择R吧,点击 Create repository 就可以创建好用于保存网站的 repository。
这个 repository name 没有要求,随便起,不像 github 的 pages 服务要求名字和 github 的账号名称一样,建议起名 domainname.com,当你有多个网站要管理的话,这样就可以一眼就可以看出是那个网站了,我自己当时就不知道可以用点,所以也不知道这样来起名字。
blogdown 建站
创建项目
现在回到 rstudio,File -> New Project -> Version Control -> Git,然后填写 Repository URL:https://github.com/yourGithubName/domainname.com,Project directory name应该自动就生成了,可以选择一个合适的文件夹存放,点击 Create Project 创建项目。
设置 gitignore
打开 rstudio 右下角的Files标签,点击.gitignore文件,改成下面这样吧(copy Yihui 的):
.Rproj.user
.Rhistory
.RData
.Ruserdata
public
static/figures
blogdown
上面的文件或者目录就不会提交到 github 上。
如果对 git 命令不是很熟悉,建议在这个时候就把.gitignore文件修改好的,因为在生成 public 文件夹之后 (后面的步骤会生成 public),再修改.gitignore文件添加public文件夹,那么Git标签那里还是不会把 public 文件夹忽略掉,要解决这个问题,可以按如下操作:
git rm -r --cached public

# 然后在.gitignore文件添加规则
public
这样下次的 git add . 就不会把 public 加进去了。
初始化 blogdown
打开:File -> New Project -> New Directory -> Website using blogdown

因为我们已经安装了 hugo,所以去掉 hugo 选项,Yihui 是建议用 hugo-xmin 主题开始我们的 blogdown 之旅的,所以这里就选择了 hugo-xmin。点击Create Project创建项目。
有人会疑问为什么要两次新建项目?这并不是必须,其实可以不做创建项目这一步,不过就要另外一个步骤,把本地项目同步到 github 仓库,可以按下面步骤处理 (详细解释可以看这里):
cd <本地项目目录>
git init
git add .
git commit -m "first comment"
git remote add origin https://github.com/<github帐号>/<仓库名称>
git remote -v
git pull origin master --allow-unrelated-histories
git push -u origin master
本地运行网站
到这里,博客已经可以在本地运行,我们试试看吧,点击菜单Help下面的Addins,如下图所示:

点击Serve Site,可能会提示安装几个包例如 shiny、miniUI 等,点击 yes 安装就行了,其实点击这个跟在 console 里面输入blogdown::serve_site()是一样的,如果你还没有安装写轮眼 xaringan,会有下面的 warning 信息:
Warning message:
In eval(quote({ :
  The xaringan package is not installed. LaTeX math may not work well.
我们乖乖的按照提示把写轮眼安装了吧(网页上的数学公式用的是 MathJax.js 实现):
install.packages("xaringan")
这个时候,已经可以在右下角Viewer标签看到网站的美貌了:
Keep it simple, but not simpler

我们也可以在浏览器输入http://127.0.0.1:4321/来浏览。
写博客
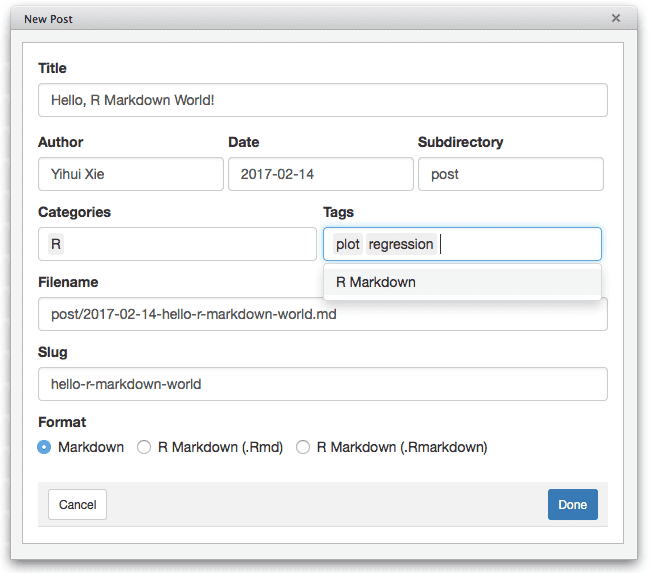
又来点击菜单Help下面的Addins,这次我们点击New Post,就会弹出下面这个画面:

Filename处会自动帮你填写为Title处的内容,Filename和Slug还是建议使用字母,尤其是Filename,如果博文里面不需要用到 R 语言的代码计算结果生成图表的话,Format处就选择Markdown格式,这可以省去一些系统生成的步骤,ok,点击Done,就会在/content/post文件夹下面生成一个文件名为2000-01-01-my-first-blog.Rmd这样的文件了,content 文件夹下面的文件就是博客的文章了。
这个时候就可以用 markdown 格式专注于写作了。
关于修改主题
如果你想修改主题,可以到这里找主题修改。
关于修改主题的非技术 TIPS,可以看看下面两段话,引用自 Yihui 的 blogdown 使用文档 1.6 Other themes 最下面引用的一段话**:原出处**
If you choose to dig a rather deep hole, someday you will have no choice but keep on digging, even with tears. -— Liyun Chen13
Yihui 是这样说的:
Another thing to keep in mind is that the more effort you make in a complicated theme, the more difficult it is to switch to other themes in the future, because you may have customized a lot of things that are not straightforward to port to another theme.
所以呢,可以先把 hugo 官网上面的主题都浏览一下,看看哪个合眼缘,挑好再改吧。
学习怎么修改主题的另外一个好去处是 hugo-xmin 的 pull request。如果你有好的改进,也可以在这里提交 pull request 让别人学习。
看看下面的 pull request 图:

设置 netlify
注册 netlify
打开 netlify 主页就可以注册了,直接在 Sign up with one of the following: 下面选择 GitHub 就行了。
绑定 github
登录进 netlify 后,点击导航栏Sites,再点击右上角New site from Git,再点击Github,如下图:

然后按照下面的图填写就可以了:

因为 hugo 生成的文件夹是public所以填 public。
点击deploy site就可以生成网站了。
这个时候可以再去到一个叫deploy settings的地方(如下图所示),确保选项选中的是none,就是只 deploy master 分支。

设置个性二级域名
这个时候生成的网站网址是<一串类似md5的字符串>.netlify.com,点击导航栏的Overview,再点击Site settings -> Change site name,就可以输入你的英文名字,这时就得到一个 netlify 的二级域名.netlify.com。
绑定个人域名
如果你不满足于 netlify 的二级域名,还可以选择绑定个人域名。
点击左边导航栏的Domain management -> Domains,

然后点击Add custom domain,这个时候就可以输入你在域名提供商处注册的域名了。
发布博客
设置好ssh url
如果之前用的是https,那么需要将remote改为ssh;如果已经是ssh则不需要修改。
可以通过如下命令来查看当前的remote方式:
git remote -v
如果当前是https的,那么可以通过如下命令修改为ssh:
git remote set-url origin [email protected]:account/project.git
至于如何获取SSH URL呢?可以在项目主页,点击右侧的SSH clone URL
点击发布
菜单Tools—Version Control,或者次顶部的按钮,或者Ctrl+Alt+M,添加commit,先pull,再push到github项目。